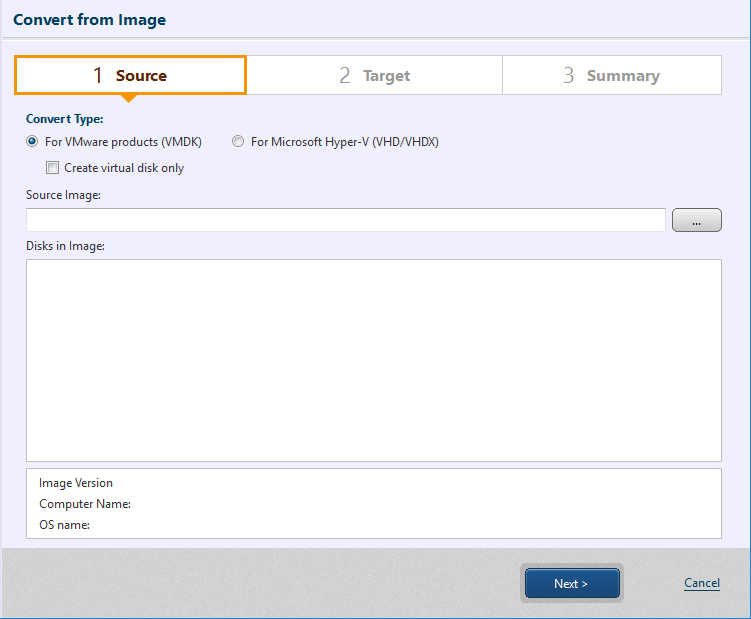
Select [Convert Type] and a source image.
Please select Convert Type. If you need to create a virtual disk instead of a virtual machine, please enable [Create virtual disk only] option.
* For Hyper-V Enterprise Edition does not support virtual conversion for VMware products.

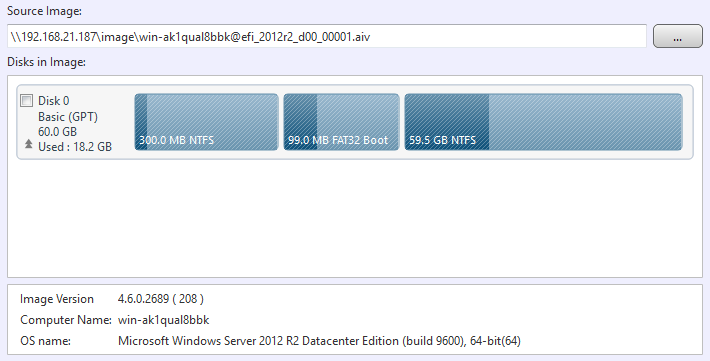
Please select a source image and disks in the image.
After configuring the settings is complete, click on [Next >].
Specify the destination. Available destinations and the setting items should differ depending on the Convert Type.selected above.
· Convert to virtual machine for VMware Products
· Convert to virtual machine for Microsoft Hyper-V environment
· Convert to virtual disk for VMware products
· Convert to virtual disk in Microsoft Hyper-V environment
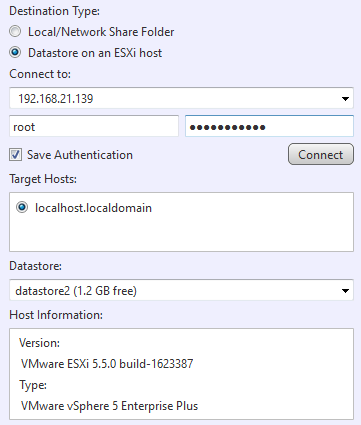
Select a datastore on vCenter Server of VMware vSphere or ESXi hypervisor as the destination. Version 5.0 or later is supported as the destination.
Specify the target host and click on [Connect]. When the connection is successfully established, the following information will be displayed in the window.

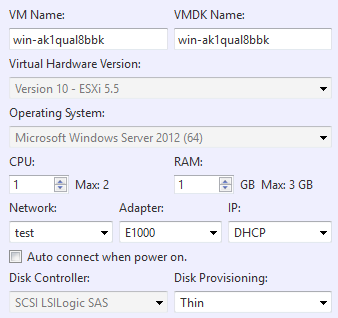
If you selected the datastore for the destination, please configure the settings for the virtual machine.
|
Item |
Description |
|
VM Name |
The default name can be changed. * Double-byte characters cannot be used to specify the name. |
|
VMDK Name |
The default name can be changed. * Double-byte characters cannot be used to specify the name. |
|
Virtual Machine Version |
To be determined depending on the version of the destination host. |
|
OS |
To be determined depending on the operating system information of the source image. |
|
CPU |
Up to the number of CPUs on the destination host can be specified. |
|
RAM |
Up to the RAM size on the destination host can be specified. |
|
Network |
Select a network option available on the destination host. * Network names with double-byte characters is not indicated. |
|
Adapter |
Select the adapter on the destination host. |
|
IP |
Only DHCP can be selected. |
|
Auto connect when power on. |
With this option enabled, the virtual machine, when booting up after conversion process, is network connected. |
|
Disk Controller |
To be determined depending on the operating system information of the source image. |
|
Disk Provisioning |
Thin or Thick provisioning (Lazy Zeroed) can be selected. |
Post Task Execution Processing ([Reboot] or [Shutdown] can be selected).

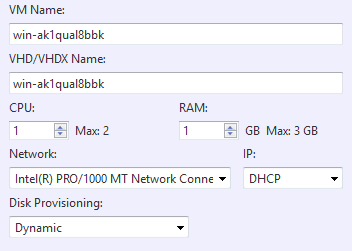
A share holder is created on Microsoft Hyper-V host as the destination. Version 2008 R2 or later is supported for the destination.
* Please make sure Microsoft .NET Framework 4 or later is configured on the conversion source host.
After specifying the connection target, click on [Connect]. When the connection is successfully established, the following information is displayed.
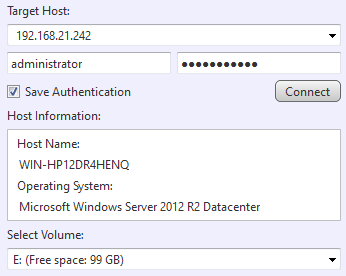
Select the volume to create the share folder and configure the settings for the virtual machine for conversion.
|
Item |
Description |
|
VM Name |
The default name can be changed. * Double-byte characters cannot be used to specify the name. |
|
VHD/VHDX Name |
The default name can be changed. * Double-byte characters cannot be used to specify the name. |
|
CPU |
Up to the number of CPUs on the destination host can be specified. |
|
RAM |
Up to the RAM size on the destination host can be specified. |
|
Network |
Select a network option available on the destination host. |
|
IP |
Only DHCP can be selected. |
|
Disk Provisioning |
Select Dynamic or Static. |
Post Task Execution Processing ([Reboot] or [Shutdown] can be selected.
Define by clicking the radio button to create the virtual machine file to a [Local or Network Share Folder] or to a [Datastore on an ESXi host]. Version 5.0 or later is supported for the destination.
If datastore is selected as the destination, specify the target host to connect and click on [Connect]. When the connection is successfully established, the following information will be displayed in the window.
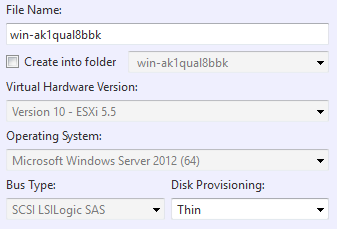
After specifying the destination, please configure the settings for the virtual disk.
|
Item |
Description |
|
File Name |
The default name can be changed. * Double-byte characters cannot be used to specify the name. |
|
Create into folder |
The file is created in the folder in datastore. The option is provided to newly create the folder. * Double-byte characters cannot be used to specify the name. |
|
Virtual Machine Version |
To be determined depending on the version of the destination host. |
|
OS |
To be determined depending on the operating system information of the source image. |
|
Bus Type |
To be determined depending on the operating system information of the source image. |
|
Disk Provisioning |
Thin or Thick Provisioning (Lazy Zeroed) can be selected. |
To create the virtual disk to local or network share folder, please specify the destination and configure the settings for the virtual disk.

|
Item |
Description |
|
File Name |
The default name can be changed. * Double-byte characters cannot be used to specify the name. |
|
Use for |
Select the virtual environment to use the created virtual disk. |
|
Bus Type |
To be determined depending on the operating system information of the source image. |
|
Disk Provisioning |
Thin or Thick Provisioning can be selected. * If you select ESXi, Thick Provisioning is selected. |
Post Task Execution Processing ([Reboot] or [Shutdown] can be selected).
Specify local or network share folder to create a virtual disk.

After specifying the destination, please configure the settings for the virtual disk.
|
Item |
Description |
|
File Name |
The default name can be changed. * Double-byte characters cannot be used to specify the name. |
|
Use for |
Select the virtual environment to use the created virtual disk. |
|
Disk Provision |
Select Dynamic or Static. |
Post Task Execution Processing [Reboot] or [Shutdown] can be selected.
Upon completion of configuring the settings, click on [Next >].
Please review the settings for virtual conversion.
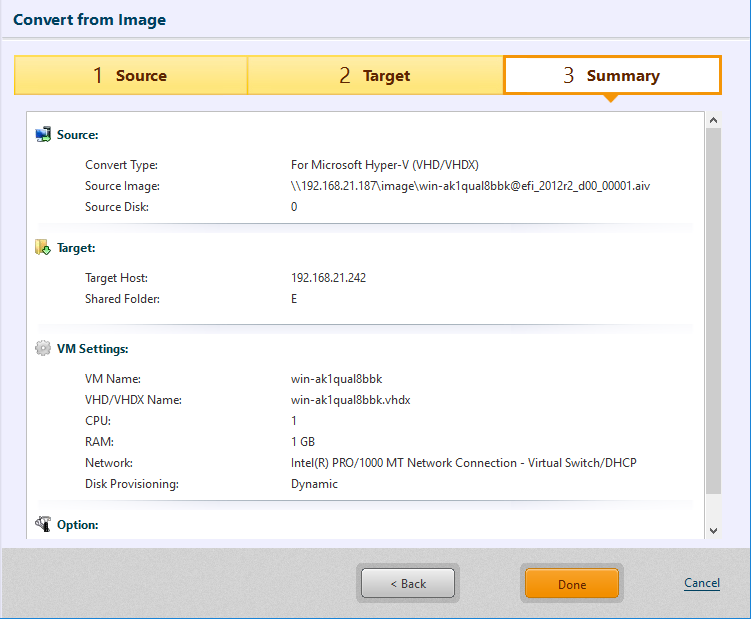
Click on [Done] to proceed with conversion processing.
If you selected Thick Provisioning for the (Disk Type) or Static, it takes more time before starting the task as the virtual disk is created in the same size as the source disk.